Manage Validations
To explore your data and fine-tune your Expectations, run an ad hoc Validation as described on this page. To run recurring Validations, use a schedule or an orchestrator.
Run an ad hoc Validation
Workflows for ad hoc Validations vary based on the following aspects of what you're validating:
- Expectation type - GX-managed or API-managed Expectations.
- Data scope - entire Data Asset or a time-based subset of a Data Asset.
- Data Source - for example, Snowflake or Amazon S3.
Find your workflow
To help you find the right workflow for your particular combination of Expectation type, data scope, and Data Source, the table below provides a summary of the workflow for each possible combination of factors and a link to detailed instructions.
| Expectations | Scope | Data Source | Workflow summary and link to full instructions |
|---|---|---|---|
| GX-managed | Entire Data Asset | AlloyDB Amazon S3 Aurora Citus Databricks SQL Neon PostgreSQL Redshift Snowflake | Use the UI:
|
| Azure Blob Storage BigQuery Google Cloud Storage | Use the API:
| ||
| Time interval | AlloyDB Aurora Citus Databricks SQL Neon PostgreSQL Redshift Snowflake | Use the UI:
| |
| Amazon S3 Azure Blob Storage Google Cloud Storage | Use the API:
| ||
| BigQuery | Use the API:
| ||
| API-managed | Entire Data Asset | All sources | Use the API:
|
| Time interval | AlloyDB Aurora BigQuery Citus Databricks SQL Neon PostgreSQL Redshift Snowflake | Use the API:
| |
| Amazon S3 Azure Blob Storage Google Cloud Storage | Use the API:
|
No matter how you run your Validations, you can view historical Validation Results in the GX Cloud UI.
GX-managed Expectations, entire asset
If your Data Source is one of the following, you can use the GX Cloud UI to validate GX-managed Expectations for your entire Data Asset:
- AlloyDB
- Amazon S3
- Aurora
- Citus
- Databricks SQL
- Neon
- PostgreSQL
- Redshift
- Snowflake
For all Data Sources, you can use the GX Cloud API to validate GX-managed Expectations for your entire Data Asset.
- Validate with the UI
- Validate with the API
Prerequisites
- A GX Cloud account with Workspace Editor permissions or greater.
- A Data Asset from AlloyDB, Amazon S3, Aurora, Citus, Databricks SQL, Neon, PostgreSQL, Redshift, or Snowflake with at least one GX-managed Expectation.
Procedure
-
In the GX Cloud UI, select the relevant Workspace and then click Data Assets.
-
In the Data Assets list, click the Data Asset name.
-
Click Validate.
Prerequisites
- A GX Cloud account with Workspace Editor permissions or greater.
- Your Cloud credentials saved in your environment variables.
- Any Data Asset with at least one GX-managed Expectation.
- Python version 3.10 to 3.13.
- An installation of the Great Expectations Python library.
Minimum version for row conditions
GX Cloud library versions prior to 1.8.1 do not support the following row conditions options. If you use any of these aspects of row conditions, make sure your GX Cloud library is version 1.8.1 or later.
- multiple condition statements
- is in, is not in, or is null operators
Procedure
To help you validate GX-managed Expectations with the GX Cloud API, GX Cloud provides a GX-managed Checkpoint you can run.
-
Define the Data Asset to validate.
Pythondata_asset_name = "my_data_asset" -
Retrieve the name of the GX-managed Checkpoint for your Data Asset.
Pythonimport great_expectations as gx
context = gx.get_context(mode="cloud")
my_checkpoint = None
checkpoint_names = [checkpoint.name for checkpoint in context.checkpoints.all()]
for name in checkpoint_names:
if "GX-Managed" in name and data_asset_name in name:
my_checkpoint = name
break -
Run the Checkpoint.
Pythoncheckpoint = context.checkpoints.get(my_checkpoint)
# The following is an example of running a Checkpoint for an in-memory dataframe Data Asset.
# If you are working with a SQL or filesystem Data Asset, omit the batch_parameters.
checkpoint.run(batch_parameters={"dataframe": test_df})
When the Validation is complete, you can view the results in the GX Cloud UI.
GX-managed Expectations, time interval
If your Data Source is one of the following, you can use the GX Cloud UI to validate GX-managed Expectations for a time-based subset of your Data Asset:
- AlloyDB
- Aurora
- Citus
- Databricks SQL
- Neon
- PostgreSQL
- Redshift
- Snowflake
For all Data Sources, you can use the GX Cloud API to validate GX-managed Expectations for a time-based subset of your Data Asset. Note that the code is different for SQL Data Sources vs. filesystem Data Sources.
- Partition and validate with the UI
- Partition and validate with the API
Prerequisites
- A GX Cloud account with Workspace Editor permissions or greater.
- A Data Asset from AlloyDB, Aurora, Citus, Databricks SQL, Neon, PostgreSQL, Redshift, or Snowflake with at least one GX-managed Expectation and at least one DATE or DATETIME column.
Procedure
To validate your data incrementally, you will first define how to partition your data into Batches and then select a specific time-based Batch to validate.
First, partition your data.
-
In the GX Cloud UI, select the relevant Workspace and then click Data Assets.
-
In the Data Assets list, click the Data Asset name.
-
Next to the current Batch configuration, click
 Edit Batch.
 -
Choose a Batch interval.
- Year partitions Data Asset records by year.
- Month partitions Data Asset records by year and month.
- Day partitions Data Asset records by year, month, and day.
-
Under Validate by, select the column that contains the DATE or DATETIME data to partition on.
-
Click Save.
Then, you can validate a Batch of data.
-
Click Validate.
-
Select one of the following options to Specify a single Batch to validate:
-
Latest Batch. Note that the latest Batch may still be receiving new data. For example, if you are batching by day and have new data arriving every hour, the latest Batch will be any data that has arrived in the current day. The latest daily Batch is not necessarily a full 24 hours worth of data.
-
Custom Batch, which will let you enter a specific period of time to validate based on how you've batched your data. For example, if you've batched your data by month, you'll be prompted to enter a Year-Month to identify the records to validate.
-
-
Click Run.
Prerequisites
- A GX Cloud account with Workspace Editor permissions or greater.
- Your Cloud credentials saved in your environment variables.
- Any Data Asset with at least one GX-managed Expectation.
- Date indicators to partition on.
- For SQL Data Sources, you need at least one DATE or DATETIME column.
- For filesystem Data Sources, your filenames must indicate the timeframe using a pattern that can be parsed with regex.
- Python version 3.10 to 3.13.
- An installation of the Great Expectations Python library.
Minimum version for row conditions
GX Cloud library versions prior to 1.8.1 do not support the following row conditions options. If you use any of these aspects of row conditions, make sure your GX Cloud library is version 1.8.1 or later.
- multiple condition statements
- is in, is not in, or is null operators
Procedure
The code for validating GX-managed Expectations on a time-based subset of a Data Asset depends on your Data Source type. For SQL Data Sources, you will partition your data based on values in a DATE or DATETIME column. For filesystem Data Sources, you will partition your data based on regex filename matching.
- SQL sources
- Filesystem sources
To validate your data incrementally, you will first define how to partition your data into Batches and then select a specific time-based Batch to validate.
First, partition your data.
-
Define the Data Asset to batch and the DATE or DATETIME column to partition on.
Pythondata_source_name = "my_data_source"
data_asset_name = "my_data_asset"
column_name = "my_date_or_datetime_column" -
Decide how you want to batch your data. Reference the table below to determine the partitioner and method to use to achieve your goal.
Goal partitioner method Partition records by year ColumnPartitionerYearlypartition_on_yearPartition records by year and month ColumnPartitionerMonthlypartition_on_year_and_monthPartition records by year, month, and day ColumnPartitionerDailypartition_on_year_and_month_and_day -
Partition your data. This example demonstrates daily Batches with the
ColumnPartitionerDailypartitioner and thepartition_on_year_and_month_and_daymethod. Refer to the above table for partitioners and methods for other types of Batches.Pythonimport great_expectations as gx
from great_expectations.core.partitioners import ColumnPartitionerDaily
context = gx.get_context(mode="cloud")
ds = context.data_sources.get(data_source_name)
asset = ds.get_asset(data_asset_name)
for bd in asset.batch_definitions:
if "GX-Managed" in bd.name:
bd.partitioner = ColumnPartitionerDaily(
method_name="partition_on_year_and_month_and_day",
column_name=column_name,
sort_ascending=True,
)
context.update_datasource(ds)
Then, you can validate a Batch of data. To help you validate GX-managed Expectations with the Cloud API, GX Cloud provides a GX-managed Checkpoint you can run.
-
Retrieve the name of the GX-managed Checkpoint for your Data Asset.
Pythonimport great_expectations as gx
context = gx.get_context()
data_asset_name = "my_data_asset"
my_checkpoint = None
checkpoint_names = [checkpoint.name for checkpoint in context.checkpoints.all()]
for name in checkpoint_names:
if "GX-Managed" in name and data_asset_name in name:
my_checkpoint = name
break -
Run the Checkpoint with Batch Parameters passed as integers.
Pythoncheckpoint = context.checkpoints.get(my_checkpoint)
batch_parameters_daily = {"year": 2019, "month": 1, "day": 30}
checkpoint.run(batch_parameters=batch_parameters_daily)
To validate your data incrementally, you will first define how to partition your data into Batches and then select a specific time-based Batch to validate.
First, partition your data.
-
Define the Data Asset to batch.
Pythondata_source_name = "my_data_source"
data_asset_name = "my_data_asset" -
Decide how you want to batch your data. Reference the table below to determine the partitioner and parameters to use to achieve your goal.
Goal partitioner parameter names Partition records by year FileNamePartitionerYearlyyearPartition records by year and month FileNamePartitionerMonthlyyear,monthPartition records by year, month, and day FileNamePartitionerDailyyear,month,day -
Partition your data. This example demonstrates daily Batches with the
FileNamePartitionerDailypartitioner and theyear,month, anddayparameter names. Refer to the above table for partitioners and parameters for other types of Batches.Python# Update this regex to match the pattern of your date-based filenames
# This example matches a name like my_filename_2019-01-30.csv
batching_regex = r"my_filename_(?P<year>\d{4})-(?P<month>\d{2})-(?P<day>\d{2})\.csv"
import great_expectations as gx
from great_expectations.core.partitioners import FileNamePartitionerDaily
context = gx.get_context(mode="cloud")
ds = context.data_sources.get(data_source_name)
asset = ds.get_asset(data_asset_name)
for bd in asset.batch_definitions:
if "GX-Managed" in bd.name:
bd.partitioner = FileNamePartitionerDaily(
regex=batching_regex,
sort_ascending=True,
param_names=("year", "month", "day"),
)
context.update_datasource(ds)
Then, you can validate a Batch of data. To help you validate GX-managed Expectations with the Cloud API, GX Cloud provides a GX-managed Checkpoint you can run.
-
Retrieve the name of the GX-managed Checkpoint for your Data Asset.
Pythonimport great_expectations as gx
context = gx.get_context()
data_asset_name = "my_data_asset"
my_checkpoint = None
checkpoint_names = [checkpoint.name for checkpoint in context.checkpoints.all()]
for name in checkpoint_names:
if "GX-Managed" in name and data_asset_name in name:
my_checkpoint = name
break -
Run the Checkpoint with Batch Parameters passed as strings.
Pythoncheckpoint = context.checkpoints.get(my_checkpoint)
batch_parameters_daily = {"year": "2019", "month": "01", "day": "30"}
checkpoint.run(batch_parameters=batch_parameters_daily)
When the Validation is complete, you can view the results in the GX Cloud UI.
API-managed Expectations, entire asset
To validate API-managed Expectations for your entire Data Asset, use the GX Cloud API. The process is the same regardless of your Data Source. You will first create a Validation Definition that links your data to your Expectations. Then you can run the Validation Definition to validate the referenced data against the associated Expectations for testing or data exploration. If you want to trigger Actions based on the Validation Results, you will add your Validation Definition to a Checkpoint that associates your tests with conditional logic for responding to results.
Prerequisites
- A GX Cloud account with Workspace Editor permissions or greater.
- Your Cloud credentials saved in your environment variables.
- Any Data Asset.
- At least one API-managed Expectation in an API-managed Expectation Suite.
- Python version 3.10 to 3.13.
- An installation of the Great Expectations Python library.
Minimum version for row conditions
GX Cloud library versions prior to 1.8.1 do not support the following row conditions options. If you use any of these aspects of row conditions, make sure your GX Cloud library is version 1.8.1 or later.
- multiple condition statements
- is in, is not in, or is null operators
Procedure
To help you validate API-managed Expectations on an entire Data Asset with the Cloud API, GX Cloud provides a GX-managed Batch Definition you can use to identify your data.
-
Retrieve your Data Asset��’s GX-managed Batch Definition.
Pythonimport great_expectations as gx
context = gx.get_context(mode="cloud")
data_source_name = "my_data_source"
data_asset_name = "my_data_asset"
batch_definition_name = f"{data_asset_name} - GX-Managed Batch Definition"
batch_definition = (
context.data_sources.get(data_source_name)
.get_asset(data_asset_name)
.get_batch_definition(batch_definition_name)
) -
Retrieve your API-managed Expectation Suite.
Pythonsuite_name = "my_expectation_suite"
suite = context.suites.get(name=suite_name) -
Create a Validation Definition that associates the Batch Definition with the Expectation Suite.
Pythondefinition_name = "my_validation_definition"
validation_definition = gx.ValidationDefinition(
data=batch_definition, suite=suite, name=definition_name
) -
Run the Validation Definition.
Python# The following is an example of running a Validation Definition for an in-memory dataframe Data Asset.
# If you are working with a SQL or filesystem Data Asset, omit the batch_parameters.
batch_parameters = {"dataframe": test_df}
validation_definition.run(batch_parameters=batch_parameters) -
Optional. Create a Checkpoint so you can trigger Actions based on the Validation Results of your API-managed Expectations.
Python# Retrieve the Validation Definition
validation_definition = context.validation_definitions.get("my_validation_definition")
# Create a Checkpoint
checkpoint_name = "my_checkpoint"
checkpoint_config = gx.Checkpoint(
name=checkpoint_name, validation_definitions=[validation_definition]
)
# Save the Checkpoint to the data context
checkpoint = context.checkpoints.add(checkpoint_config)
# Run the Checkpoint
# The following is an example of running a Checkpoint for an in-memory dataframe Data Asset.
# If you are working with a SQL or filesystem Data Asset, omit the batch_parameters.
checkpoint.run(batch_parameters=batch_parameters)
When the Validation is complete, you can view the results in the GX Cloud UI.
API-managed Expectations, time interval
To validate API-managed Expectations for a time-based subset of a Data Asset, use the GX Cloud API. Note that the code is different for SQL Data Sources vs. filesystem Data Sources. You will first partition your data and create a Validation Definition that links your partitioned data to your Expectations. Then you can run the Validation Definition to validate the referenced data against the associated Expectations for testing or data exploration. If you want to trigger Actions based on the Validation Results, you will add your Validation Definition to a Checkpoint that associates your tests with conditional logic for responding to results.
Prerequisites
- A GX Cloud account with Workspace Editor permissions or greater.
- Your Cloud credentials saved in your environment variables.
- Any Data Asset.
- Date indicators to partition on.
- For SQL Data Sources, you need at least one DATE or DATETIME column.
- For filesystem Data Sources, your filenames must indicate the timeframe using a pattern that can be parsed with regex.
- At least one API-managed Expectation in an API-managed Expectation Suite.
- Python version 3.10 to 3.13.
- An installation of the Great Expectations Python library.
Minimum version for row conditions
GX Cloud library versions prior to 1.8.1 do not support the following row conditions options. If you use any of these aspects of row conditions, make sure your GX Cloud library is version 1.8.1 or later.
- multiple condition statements
- is in, is not in, or is null operators
Procedure
The code for validating API-managed Expectations on a time-based subset of a Data Asset depends on your Data Source type. For SQL Data Sources, you will partition your data based on values in a DATE or DATETIME column. For filesystem Data Sources, you will partition your data based on regex filename matching.
- SQL sources
- Filesystem sources
To validate your data incrementally, you will first define how to partition your data into Batches and then select a specific time-based Batch to validate.
-
Retrieve your Data Asset.
Pythondata_source_name = "my_data_source"
data_asset_name = "my_data_asset"
import great_expectations as gx
context = gx.get_context(mode="cloud")
ds = context.data_sources.get(data_source_name)
data_asset = ds.get_asset(data_asset_name) -
Decide how you want to batch your data. Reference the table below to determine the method to use to achieve your goal.
Goal method Partition records by year add_batch_definition_yearlyPartition records by year and month add_batch_definition_monthlyPartition records by year, month, and day add_batch_definition_daily -
Partition your data. This example demonstrates daily Batches with the
add_batch_definition_dailymethod. Refer to the above table for methods for other types of Batches.Pythonbatch_definition_name = "my_daily_batch_definition"
date_column = "my_date_or_datetime_column"
daily_batch_definition = data_asset.add_batch_definition_daily(
name=batch_definition_name, column=date_column
) -
Retrieve your API-managed Expectation Suite.
Pythonsuite_name = "my_expectation_suite"
suite = context.suites.get(name=suite_name) -
Create a Validation Definition that associates your time-based Batch Definition with your API-managed Expectation Suite.
Pythondefinition_name = "my_validation_definition"
validation_definition = gx.ValidationDefinition(
data=daily_batch_definition, suite=suite, name=definition_name
)
validation_definition = context.validation_definitions.add(validation_definition) -
Run the Validation Definition with Batch Parameters passed as integers.
Pythonbatch_parameters_daily = {"year": 2019, "month": 1, "day": 30}
validation_definition.run(batch_parameters=batch_parameters_daily) -
Optional. Create a Checkpoint so you can trigger Actions based on the Validation Results of your API-managed Expectations.
Python# Retrieve the Validation Definition
validation_definition = context.validation_definitions.get("my_validation_definition")
# Create a Checkpoint
checkpoint_name = "my_checkpoint"
checkpoint_config = gx.Checkpoint(
name=checkpoint_name, validation_definitions=[validation_definition]
)
# Save the Checkpoint to the data context
checkpoint = context.checkpoints.add(checkpoint_config)
# When you run the Checkpoint, pass Batch Parameters as integers
batch_parameters_daily = {"year": 2019, "month": 1, "day": 30}
checkpoint.run(batch_parameters=batch_parameters_daily)
To validate your data incrementally, you will first define how to partition your data into Batches and then select a specific time-based Batch to validate.
-
Retrieve your Data Asset.
Pythondata_source_name = "my_data_source"
data_asset_name = "my_data_asset"
import great_expectations as gx
context = gx.get_context(mode="cloud")
ds = context.data_sources.get(data_source_name)
data_asset = ds.get_asset(data_asset_name) -
Decide how you want to batch your data. Reference the table below to determine the method and parameters to use to achieve your goal.
Goal method parameter names Partition records by year add_batch_definition_yearlyyearPartition records by year and month add_batch_definition_monthlyyear,monthPartition records by year, month, and day add_batch_definition_dailyyear,month,day -
Partition your data. This example demonstrates daily Batches with the
add_batch_definition_dailymethod. Refer to the above table for methods and parameters for other types of Batches.Pythonbatch_definition_name = "my_daily_batch_definition"
# Update this regex to match the pattern of your date-based filenames
# This example matches a name like my_filename_2019-01-30.csv
batching_regex = r"my_filename_(?P<year>\d{4})-(?P<month>\d{2})-(?P<day>\d{2})\.csv"
batch_definition = data_asset.add_batch_definition_daily(
name=batch_definition_name, regex=batching_regex
) -
Retrieve your API-managed Expectation Suite.
Pythonsuite_name = "my_expectation_suite"
suite = context.suites.get(name=suite_name) -
Create a Validation Definition that associates your time-based Batch Definition with your API-managed Expectation Suite.
Pythondefinition_name = "my_validation_definition"
validation_definition = gx.ValidationDefinition(
data=batch_definition, suite=suite, name=definition_name
)
validation_definition = context.validation_definitions.add(validation_definition) -
Run the Validation Definition with Batch Parameters passed as strings.
Pythonbatch_parameters_daily = {"year": "2019", "month": "01", "day": "30"}
validation_definition.run(batch_parameters=batch_parameters_daily) -
Optional. Create a Checkpoint so you can trigger Actions based on the Validation Results of your API-managed Expectations.
Python# Retrieve the Validation Definition
validation_definition = context.validation_definitions.get("my_validation_definition")
# Create a Checkpoint
checkpoint_name = "my_checkpoint"
checkpoint_config = gx.Checkpoint(
name=checkpoint_name, validation_definitions=[validation_definition]
)
# Save the Checkpoint to the data context
checkpoint = context.checkpoints.add(checkpoint_config)
# When you run the Checkpoint, pass Batch Parameters as strings
batch_parameters_daily = {"year": "2019", "month": "01", "day": "30"}
checkpoint.run(batch_parameters=batch_parameters_daily)
When the Validation is complete, you can view the results in the GX Cloud UI.
View Validation run history
-
In GX Cloud, select the relevant Workspace and then click Data Assets.
-
In the Data Assets list, click the Data Asset name.
-
Click the Validations tab.
-
If you have multiple Expectation Suites, select the suite of interest.
-
Do one or more of the following:
-
To view results for a specific Validation run, select an entry in the Batches & run history pane.
- To view only Expectations that failed in the selected run, click Failures only.
-
To view the run history of all Validations, select All Runs to view a graph showing the Validation run history for all columns.
- To view details about a specific Validation run in the Validation timeline, including the observed values, hover over a success or failure severity icon.
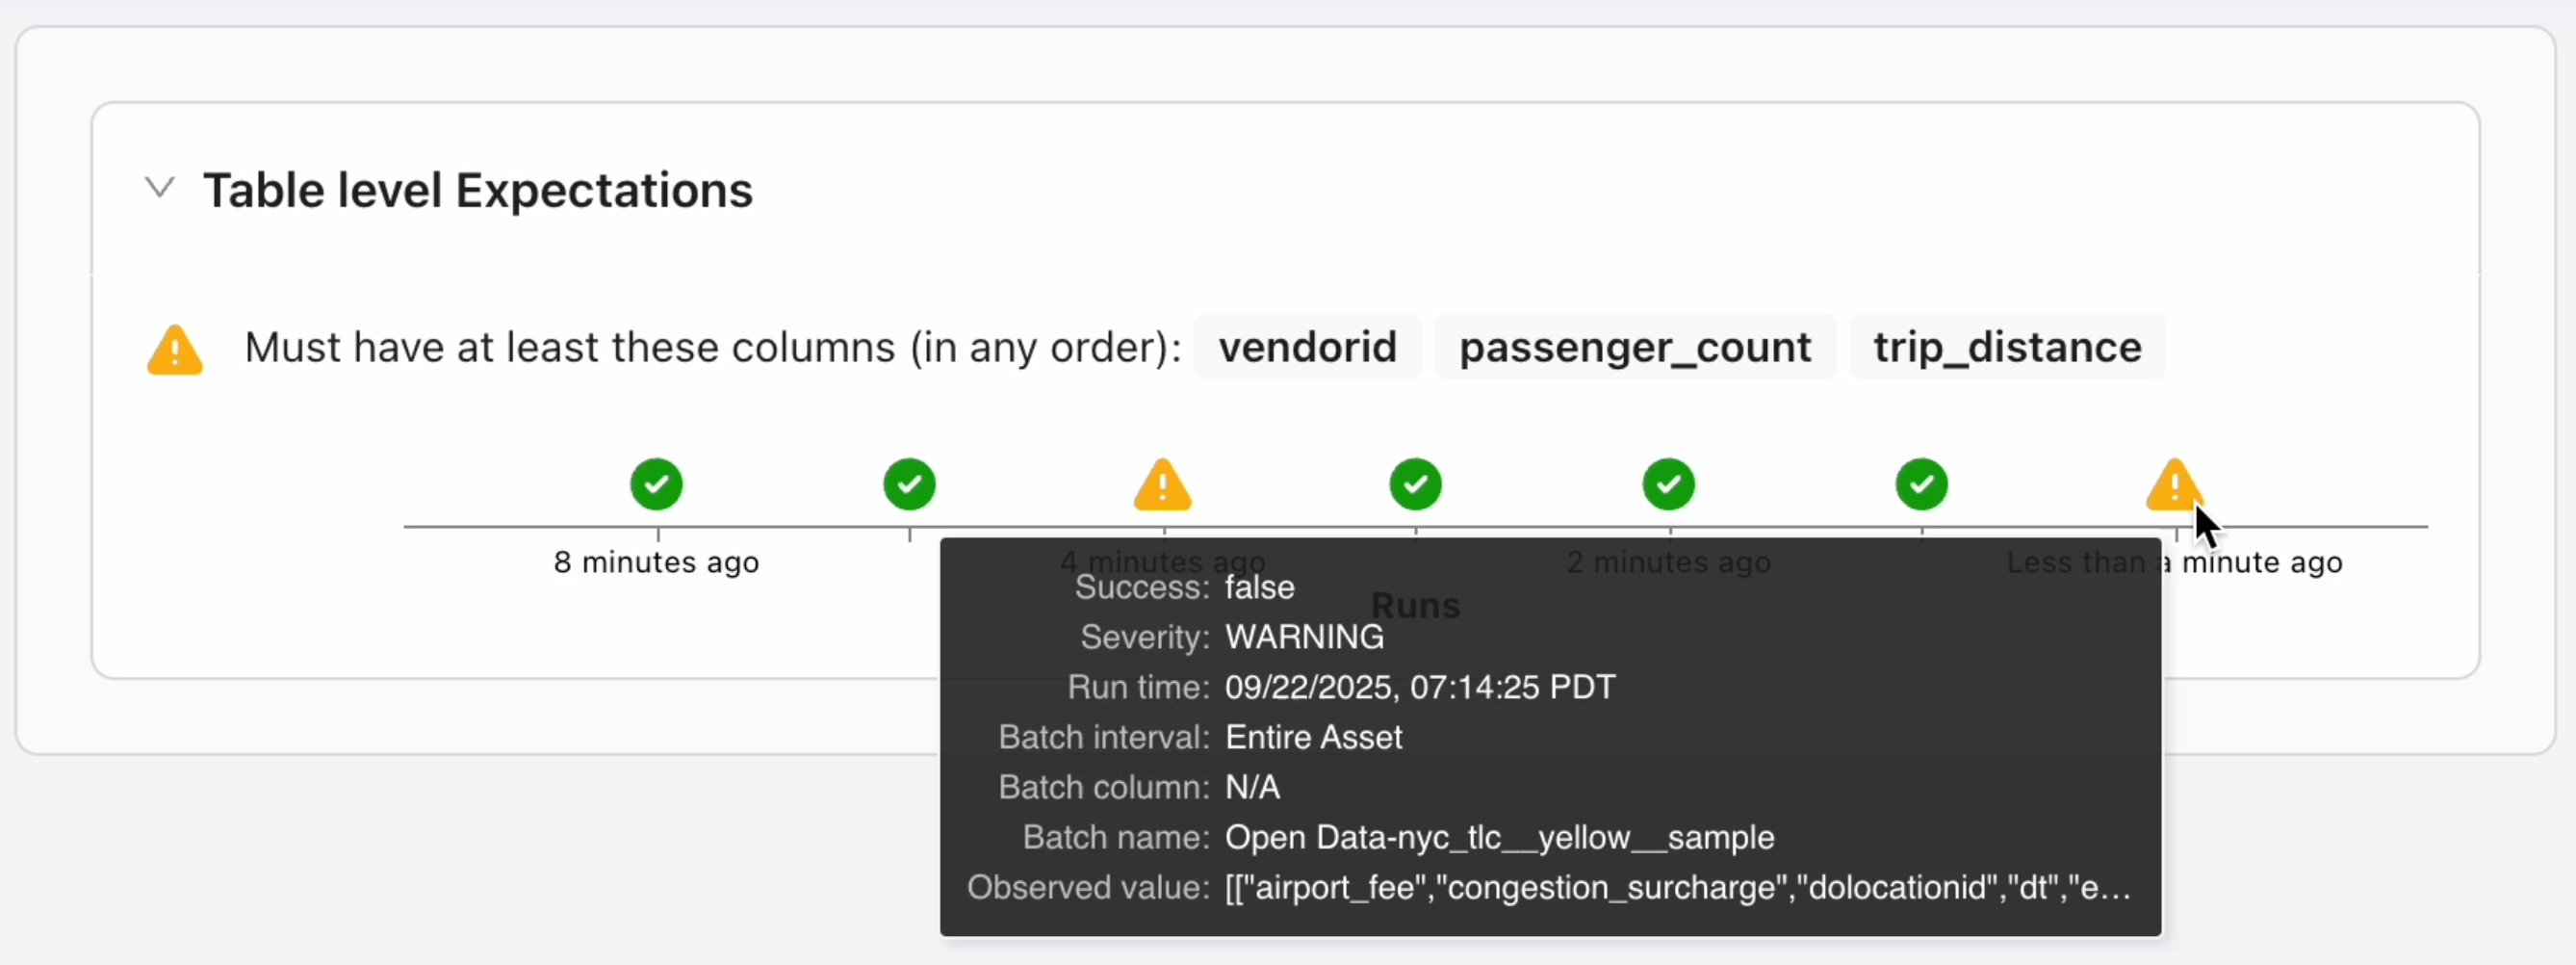
Run history detailsDepending on how your Data Assets are validated, you may find the following information on entries in the Batches & run history pane.
- A
 calendar icon indicates a Validation ran by a GX-managed schedule.
 - Batch information is included for any Validation ran on a subset of a Data Asset.
-
-
Optional. Click Share to copy the URL for the Validation Results and share them with other users in your workspace.